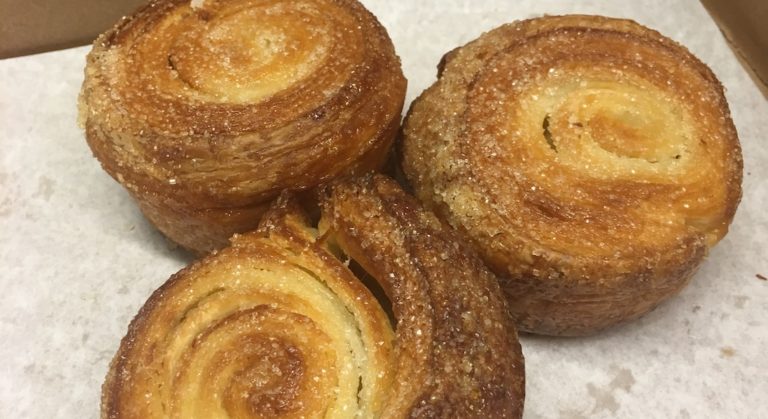

Famous French pastry chef in the United States, Dominique Ansel imported and first began popularizing the kouign-amann seven years ago. “We started offering kouign-amanns at the opening of the store,” he says, referring to his New York bakery, Dominique Ansel Bakery. “It was unknown before. We helped Americans discover it,” he recounts. This Breton pastry (from Brittany, in other words) is made from butter, flour, yeast and sugar has now found its footing in the United States and has gained much widespread popularity (This weekend, The New York Times is leading their Cooking App, with a Kouign-Amann). From Ansel’s signature DKA to a good old-fashioned kouign-amann served in your neighborhood bakery, this pastry should be at the top of your list for trying (that is, if you’re not already buying one weekly).
Here’s the complete and detailed recipe of Ansel’s signature DKA:

MAKE DOUGH
- Combine the bread our, salt, water, 1 tablespoon (14 grams) of the butter, and the yeast in a stand mixer fitted with a dough hook. Mix on low speed for 2 minutes to combine. Increase the speed to medium-high and beat for 10 minutes. When finished, the dough will be smooth and slightly tacky and will have full gluten development. Test by stretching it—the dough will have some elasticity.
- Lightly grease a medium bowl with nonstick cooking spray. Transfer the dough to the bowl. Cover loosely with plastic wrap and proof at room temperature until doubled in size, about 1 hour.
- Punch down the dough by folding the edges into the center, releasing as much of the gas as possible, and turn it out onto a large sheet of plastic wrap. Using your palms, press it to form a 10-inch (25 cm) square. Wrap it tightly in the plastic wrap and place in the freezer for 15 minutes.
- Flip the dough and return it to the freezer for another 15 minutes so that it chills evenly.
MAKE BUTTER BLOCK
- While the dough is chilling, draw a 7-inch (18 cm) square on a piece of parchment paper with a pencil. Flip the parchment over so that the butter won’t come in contact with the pencil marks. Place the remaining 25 tablespoons (350 grams) butter in the center of the square and spread it evenly with an offset spatula to fill the square. Refrigerate the butter until firm but still pliable, about 20 minutes. (Whenever you are laminating dough, it is important that the consistency and temperature of the dough match those of the butter.)
- Remove the butter from the refrigerator. It should still be soft enough to bend slightly without cracking. If it is too firm, lightly beat it with a rolling pin on a lightly floured work surface until it becomes pliable. Make sure to press the butter back to its original 7-inch (18 cm) square after working it.
- Remove the dough from the freezer; make sure it is very cold throughout. Place the dough on a lightly floured work surface. Arrange the butter block in the center of the dough so it looks like a diamond in the center of the square (rotated 45 degrees, with the corners of the butter facing the center of the dough sides). Pull the corners of the dough up and over to the center of the butter block. Pinch the seams of the dough together to seal the butter inside. You should have a square slightly larger than the butter block.
- With a rolling pin, using steady, even pressure, roll the dough out from the center so that it triples in length. This will take several passes. Use extra flour to dust the work surface to ensure that nothing sticks. When finished, you should have a rectangle about 24 by 10 inches (60 by 25 cm) and 1⁄4 inch (6 mm) thick. (Keeping the dough’s rectangular shape is very important at this point to ensure even layers throughout the process. You will need a large area to roll out the dough.)
MAKE FIRST THREE FOLDS
- Place the dough so the longer sides run left to right. From the right side fold one-third of the dough onto itself, keeping the edges lined up with each other. From the left side fold the remaining one-third of dough on top of the side that has already been folded. Line up all the edges so that you are left with an even rectangle. The dough is being folded as if it were a piece of paper going into an envelope; this is called a “letter fold.” Do not rest the dough and immediately move on to the next fold. (When making the DKA, speed is very important. Work the dough as quickly as possible, otherwise it will soften and the butter will push out of the seams. This results in a dense and doughy product.)
- Starting with the seam of the dough on the right, roll out the dough, vertically from top to bottom, to a rectangle about 24 by 10 inches (60 by 25 cm) and 1⁄4 inch (6mm) thick. Repeat the letter fold.
- Immediately roll out the dough again to a rectangle about 24 by 10 inches (60 by 25 cm) and 1⁄4 inch (6 mm) thick exactly as in step 2. Repeat the letter fold. Wrap the dough in plastic wrap and refrigerate for 30 to 40 minutes to rest.
MAKE FOURTH FOLD
Sprinkle sugar in a thin, even layer on the work surface (as if you were flouring the work surface, but using sugar instead). Lay out the dough on the sugar. Starting with the seam of the dough on the right, roll out the dough once more, vertically from top to bottom, to a rectangle about 24 by 10 inches (60 by 25 cm) and 1⁄4 inch (6 mm) thick. Sprinkle a thin, even layer of sugar on the top. Repeat the letter fold. (Work quickly when you add the sugar, as it will start to draw out moisture from the dough and make the surface wet.)
ROLL, SHAPE, AND BAKE
- Sprinkle another thin, even layer of sugar on the work surface. Place the dough on the sugar. Starting with the seam on the right, roll out the dough one final time to a rectangle about 24 by 10 inches (60 by 25 cm) and 1⁄4 inch (6 mm) thick. Sprinkle another thin layer of sugar on top.
- Using a chef’s knife, cut the dough into 4-inch (10 cm) squares. Each square should weigh about 3.5 ounces (100 grams). Sprinkle a little bit more sugar on the work surface. Fold in the corners of each square to meet at the center, pushing the center down firmly. Repeat with the new corners that were formed, again pushing down firmly in the center.
- Line a half sheet pan with a silicone baking mat. Spray lightly with nonstick spray and sprinkle with enough granulated sugar to just lightly coat it. Place the ring molds 4 inches (10 cm) apart on the pan.
- Place a square of dough in the center of each ring. The dough will hang over the edges of the mold. Fold the excess dough into the center of the DKA and press down firmly. Proof at room temperature, 15 to 20 minutes
- While the DKAs are proofing, place a rack in the center of the oven and preheat the oven to 365°F (185°C) for conventional or 340°F (170°C) for convection
- Bake the DKAs on the center rack for 15 minutes. Rotate the pan 180 degrees and bake for 15 minutes more. The DKAs are finished when they turn golden brown and have about doubled in size
- Remove from the oven. Using a pair of stainless-steel tongs, unmold the DKAs onto a sheet pan while still hot: Grab the metal rings with the tongs and flip the DKAs over so the flat side is up. Remove the rings. Let the DKAs cool completely, still inverted.
SERVING INSTRUCTIONS: Enjoy at room temperature. If you are looking for more adventure, slice a DKA in half horizontally and add a scoop of ice cream to make an ice cream sandwich.
STORAGE INSTRUCTIONS: DKAs should be consumed within 6 hours of baking, but can keep at room temperature about two days, or 2 weeks frozen.